
A Shopify SEO checklist gives store owners a step-by-step process to optimize their store for Google. Opensend reports that organic search drives roughly 40% of all ecommerce traffic. This checklist covers 30 steps organized by priority, from foundational setup to advanced optimization, so you work on what matters most first.
This is the practical companion to our strategy guide. For the full reasoning behind each step, see our Shopify SEO guide.
What SEO Setup Should You Complete Before Launching?
Complete these six foundational steps before publishing products or launching your domain. Full reasoning for each is in our Shopify SEO guide setup section.
Step 1: Connect a Custom Domain
Go to Settings > Domains. Buy a domain through Shopify or connect one from a registrar like Namecheap. Choose either the www or non-www version as your primary domain. Shopify automatically redirects the other.
Step 2: Set Up Google Analytics 4
Navigate to Online Store > Preferences. Paste your GA4 measurement ID (starts with G-) in the Google Analytics field. Verify it’s working by checking real-time reports in GA4 within a few hours.
Step 3: Verify Google Search Console and Submit Your Sitemap
Go to Google Search Console, add your domain, and verify ownership using the DNS method. Once verified, submit your sitemap at yourdomain.com/sitemap.xml. Shopify generates and updates this automatically.
Step 4: Connect Google Merchant Center
Install the Google & YouTube sales channel from your Shopify admin under Sales channels > Google & YouTube. Connect your Google account, verify your domain, and sync your product feed. Fix any disapproved products immediately because feed errors hurt your overall account health.
Step 5: Choose an SEO-Friendly Theme
Use a Shopify 2.0 theme. Shopify’s free Dawn theme is a strong starting point: fast, clean, and built by Shopify’s own team. If buying a premium theme, check its PageSpeed score before purchasing.
Step 6: Set Your Preferred URL Structure
Rename the default blog handle under Online Store > Blog posts > Manage blogs. Change “News” to “Blog” or “Insights.” Decide early — changing URLs later means redirects. Keep all URL handles short, descriptive, and free of filler words.
How Do You Optimize Shopify Product Pages for SEO?
Work through these eight steps for each product page. The full product-page playbook — description templates, schema details, review app setup — is in our Shopify product page SEO guide.
Step 7: Write Unique Product Titles with the Primary Keyword Front-Loaded
Go to Products > [Product] > Title. Put your primary keyword at the beginning. “Organic Cotton T-Shirt for Men” beats “The Breezy Tee – Men’s Collection.” Keep titles under 70 characters.
Step 8: Customize URL Handles Before Publishing
Go to Products > [Product] > Search engine listing > URL handle. Shorten to the core keyword — /products/organic-cotton-tshirt-men, not the auto-generated 12-word slug. Remove filler words. Keep under 5 words. Fix it before publishing because changing URLs later requires redirects.
Step 9: Write Unique Product Descriptions (300+ Words Minimum)
Write at least 300 original words for every product. Cover what it is, who it’s for, why it’s different, how to use it, and what’s included. Break the text with subheadings, bullet points, and short paragraphs. Never paste the manufacturer’s copy.

Step 10: Add Alt Text to Every Product Image
Go to Products > [Product] > Media, click each image, and fill in the Alt text field. Describe the image naturally: “Men’s organic cotton t-shirt in navy blue, front view.” 5 to 15 words. Don’t keyword stuff.
Step 11: Write Custom Meta Titles and Meta Descriptions
Go to Products > [Product] > Search engine listing. Meta title: 50 to 60 characters with your primary keyword. Meta description: 140 to 155 characters with a benefit or hook like “Free shipping” or “Handmade in the US.”
Step 12: Add Product Schema Beyond Your Theme’s Default
Paste a product URL into Google’s Rich Results Test. Add missing fields through your theme’s Liquid (application/ld+json in main-product.liquid) or an app like JSON-LD for SEO. Prioritize aggregate rating, GTIN, brand, and review count.
Step 13: Enable and Encourage Customer Reviews
Install a review app like Judge.me, Stamped, or Yotpo. Set up automated review request emails 7 to 14 days after delivery. Display reviews on the product page, not hidden behind a tab. Make sure the app outputs Review schema markup.
Step 14: Cross-Link Related Products in Descriptions
Within product descriptions, link naturally to related products and collections. “Pair this with our [organic cotton joggers](/products/organic-cotton-joggers) for a complete look.” Aim for 2 to 3 internal links per description — HTML links in body copy carry more SEO weight than JS-rendered “you may also like” widgets.
Warning: Don’t bulk-copy meta tags across products with slight word swaps. Google recognizes template-based meta descriptions and may ignore them entirely. Write each one from scratch.
How Do You Optimize Collection Pages?
Collection pages are your category pages. They target broader, higher-volume keywords that product pages can’t compete for. A well-optimized collection page for “men’s running shoes” can rank for a term that brings in hundreds of shoppers per month, while individual shoe product pages target the specific model names.
Step 15: Write Unique Collection Descriptions (100-200 Words)
Most Shopify stores leave their collection pages as nothing more than a grid of product thumbnails. Google sees a page with almost no text content and ranks it accordingly.
Go to Products > Collections > [Collection] and write 100 to 200 words of original content above the product grid. Explain what the collection contains, who it’s for, and what makes your selection different. Include your primary keyword naturally. This content gives Google something to index beyond product titles and prices.
Step 16: Customize Collection Meta Titles and Descriptions
Just like product pages, Shopify auto-generates collection meta tags from the collection title. These are generic and don’t include the keyword modifiers that shoppers actually search for.
Go to Products > Collections > [Collection] > Search engine listing. Optimize the meta title to include a keyword modifier like “Shop,” “Buy,” or “Best.” For example, “Men’s Running Shoes | Shop Lightweight Trainers” tells both Google and the shopper what they’ll find. Write a description that mentions your product count, brands, or price range.
Step 17: Organize Collections into a Logical Hierarchy
Flat collection structures work for small catalogs. But if you have 50+ products, you need parent and child collections that mirror how people actually browse and search.
Create top-level collections (Men’s Shoes, Women’s Shoes) and nest subcollections under them (Running Shoes, Casual Shoes, Dress Shoes). Use Shopify’s navigation menu under Online Store > Navigation to build this hierarchy. Your main menu structure tells Google which pages are most important. Put your highest-priority collections in the main navigation.
Step 18: Link from Collection Descriptions to Featured Products and Blog Posts
Collection descriptions are a prime spot for internal links. They sit on high-authority category pages and can direct link equity to specific products you want to rank or blog posts that educate shoppers.
In each collection description, link to 2 to 3 featured or best-selling products by name. Also link to a relevant blog post if you have one. “Looking for help choosing? Read our [guide to finding the right running shoe](/blogs/insights/how-to-choose-running-shoes)” supports both the collection and the blog post in search.
What Technical SEO Should You Fix on Shopify?
Technical SEO on Shopify is about removing speed and crawling barriers that prevent your content from ranking. Google’s research shows that 53% of mobile visitors leave if a page takes more than 3 seconds to load. And Google/Deloitte’s “Milliseconds Make Millions” study found that a 0.1-second speed improvement increases retail conversions by 8.4%. These six steps address the technical problems that most commonly hold Shopify stores back.
Step 19: Compress All Images to Under 200KB
Uncompressed images are the top page speed killer on Shopify stores. Uncompressed product images routinely land at 2 to 5 MB each — 10 to 25 times larger than they need to be.
Use an app like TinyIMG or Crush.pics. Set it to auto-compress new uploads and bulk-compress existing images. Target under 200KB per image. Use WebP format when your theme supports it (most 2.0 themes do).
Step 20: Audit and Remove Unused Apps
Every Shopify app adds JavaScript to your store. Some add CSS, fonts, and external API calls too. It’s common to find stores running 15+ apps where half are inactive or duplicating functions.
Go to Settings > Apps and sales channels. If you haven’t used an app in 30 days, uninstall it. Some apps leave code behind even after removal, so check Online Store > Themes > Edit Code for leftover script tags. Fewer apps mean faster pages and better rankings.
Step 21: Verify Canonical Tags on Product Pages
Shopify creates a known duplicate content issue. When a product appears in a collection, it’s accessible at both /products/product-name and /collections/collection-name/products/product-name. Shopify adds canonical tags pointing to the /products/ version, but it’s your job to verify they’re working correctly.
View the source of a product page accessed through a collection URL. Search for rel="canonical" in the HTML. It should point to the clean /products/product-name URL. If it doesn’t, check your theme’s head section for anything overriding Shopify’s default canonical behavior. For a deeper dive, see our technical SEO for Shopify guide.
Step 22: Add Breadcrumb Schema via Your Theme’s Liquid Template
Breadcrumbs help users and Google understand your site hierarchy. Google can display them directly in search results, replacing raw URLs with clean navigation paths.
Most 2.0 themes show visual breadcrumbs but don’t all output BreadcrumbList schema. Check snippets/breadcrumbs.liquid for a BreadcrumbList JSON-LD block. If it’s missing, add it. Test with Google’s Rich Results Test.
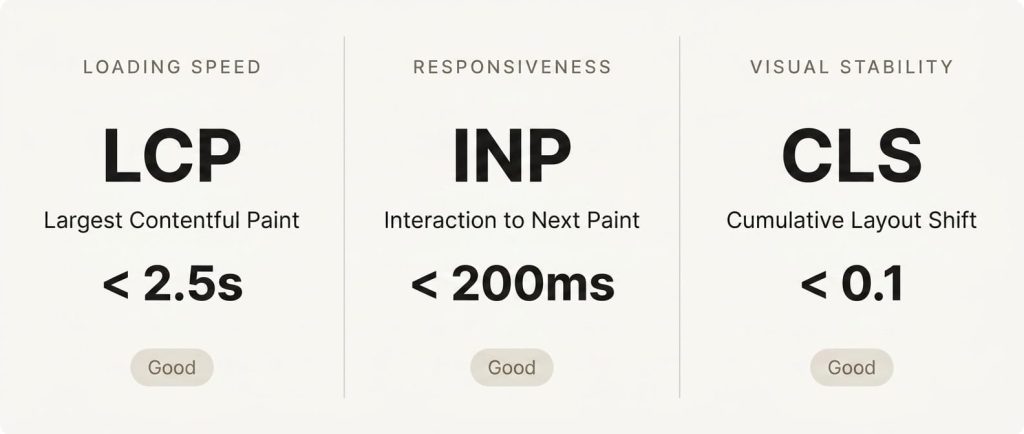
Step 23: Test Core Web Vitals in PageSpeed Insights
Core Web Vitals directly affect rankings. Target: LCP under 2.5 seconds, INP under 200 milliseconds, CLS under 0.1.
Run your homepage, a product page, and a collection page through PageSpeed Insights. Focus on field data over lab data when available. Common Shopify fixes: lazy-load below-the-fold images, preload your hero image, defer non-critical JavaScript, and reduce installed apps.
Step 24: Customize robots.txt.liquid to Control Crawler Access
Shopify 2.0 gives you the ability to customize your robots.txt file through a Liquid template. This lets you block crawlers from wasting their budget on pages that shouldn’t be indexed, like internal search results, filtered collection views, and account pages.
Go to Online Store > Themes > Edit Code and look for robots.txt.liquid in the templates folder. If it doesn’t exist, create it. Add Disallow rules for paths like /search, /cart, /account, and filtered collection URLs with parameters. Be careful not to block anything that should be indexed. Test your changes with Google’s robots.txt tester in Search Console.
Pro Tip: After the technical fixes, check that your homepage is converting the traffic you earn — see our Shopify homepage checklist.
How Does Content Drive Shopify SEO?
Content is how you capture informational search traffic, the people who aren’t ready to buy yet but are researching. HubSpot reports that companies that blog get 55% more website visitors than those that don’t. These three steps turn your Shopify blog from an afterthought into an SEO engine.
Step 25: Create a Blog Content Plan Targeting Informational Keywords
Don’t blog randomly. Build a plan around questions your customers ask before they buy: “how to,” “best,” “what is,” and “guide to” queries.
Start with 10 to 15 keywords tied to your products. If you sell running shoes, target “how to choose running shoes” and “best running shoes for flat feet.” Map each keyword to a blog post. Publish at least 2 posts per month, but prioritize quality over volume.
Step 26: Link Every Blog Post to at Least One Product or Collection Page
Blog posts that don’t link to your products are a missed opportunity. Every informational article should guide the reader toward a product or collection that’s relevant to the topic they just read about.
Within each post, include 1 to 3 natural links to product or collection pages. “If you’re looking for a shoe that handles flat feet, check out our [stability running shoes collection](/collections/stability-running-shoes)” ties the content to commerce. These internal links pass SEO authority from your blog to your money pages and help shoppers take the next step.
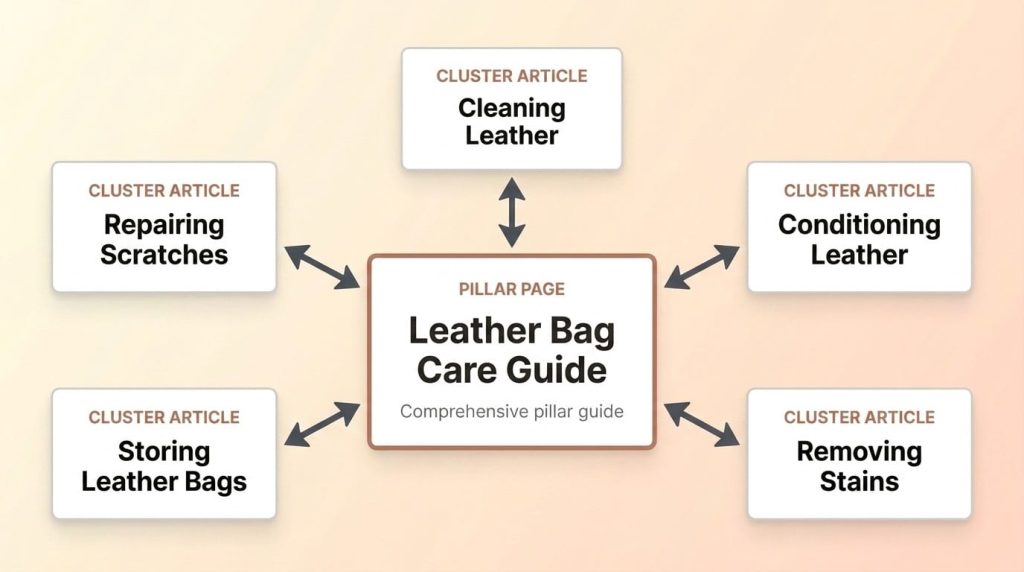
Step 27: Build Topic Clusters Around Your Core Product Categories
A topic cluster is a pillar page surrounded by supporting blog posts, all interlinked. This tells Google you’re an authority, not just a store that published one random article.
For each product category, create one pillar page covering the topic broadly. Then write 5 to 10 supporting posts on specific subtopics. Link every supporting post to the pillar and vice versa. This web of internal links builds topical authority faster than isolated posts.
What Off-Page SEO Should Shopify Stores Focus On?
Off-page SEO is about earning backlinks and mentions from other websites. Backlinks remain one of Google’s strongest ranking signals. For Shopify stores, the most effective link-building strategies are product-focused and don’t require cold outreach to strangers. These three steps cover the highest-ROI off-page tactics for ecommerce.
Step 28: Get Listed on Supplier and Manufacturer “Where to Buy” Pages
Brands you carry often have “Where to Buy” or “Authorized Retailers” pages. These are free, high-authority backlinks you just need to ask for.
List every brand you carry. Visit each brand’s site and look for a dealer locator page. If you’re not listed, contact their marketing team and request inclusion with your store URL and logo. These links carry strong authority from relevant, established domains.
Step 29: Submit Products to Niche “Best Of” Roundup Posts
Bloggers regularly publish “best of” lists like “Best Organic T-Shirts” or “Top Running Shoes for Beginners.” Getting featured earns backlinks and qualified referral traffic.
Search for “[your product category] best” and “[your product category] roundup.” Find articles listing products from multiple brands. Reach out with a short pitch and offer a free sample if appropriate. Focus on niche sites over generic lifestyle blogs.
Step 30: Claim Local Directory Listings If You Have a Physical Location
If you have a physical store, warehouse, or showroom, local SEO can drive both foot traffic and online sales. Local listings create backlinks and build trust signals that help your entire domain rank better.
Start with Google Business Profile (formerly Google My Business). Then claim listings on Yelp, Bing Places, Apple Maps, and industry-specific directories. Make sure your name, address, and phone number are identical across every listing. Even small inconsistencies (like “St” vs “Street”) can dilute your local SEO signals.
Frequently Asked Questions
How long does it take to complete this Shopify SEO checklist?
Most stores can complete Steps 1 through 14 in 2 to 3 focused days. Technical fixes add 1 to 2 more days. Content creation and link building (Steps 25 through 30) are ongoing weekly commitments.Do I need a Shopify SEO app?
Not for most steps. Steps 1 through 18 don’t require apps. Apps help most with image compression (Step 19), schema markup (Step 12), and redirect management. Avoid “all-in-one” SEO apps that add bloat. Pick single-purpose apps for specific tasks.
What’s the most important step on this checklist?
Writing unique product descriptions (Step 9). Most stores paste manufacturer copy, creating duplicate content across hundreds of competing sites. Google picks one version to rank, and it usually isn’t a reseller. Original descriptions are what set your store apart.
How often should I revisit this checklist?
Quarterly for technical items (Steps 19 through 24). Monthly for meta tags and collection content. Weekly for monitoring Search Console. Apply Steps 7 through 14 every time you add new products.
Can I do Shopify SEO without coding knowledge?
Yes. Steps 1 through 18 require zero coding. Steps 19 through 24 may need basic Liquid editing or an app. If you’re not comfortable with theme code, an app like JSON-LD for SEO or a developer’s one-time setup covers the technical pieces.
Start Optimizing Your Shopify Store Today
This 30-step Shopify SEO checklist covers everything from initial store setup to advanced off-page strategies. The key is to work through it in order. Foundational steps (1 through 6) make everything else possible. Product page optimization (7 through 14) has the most direct impact on revenue. Technical fixes (19 through 24) remove the barriers holding your rankings back.
Don’t try to complete everything in one day. Pick a section, work through it, and move to the next. Consistency beats intensity with SEO.
For the complete strategy behind each step, read our Shopify SEO guide. If you’d rather have a team handle this for you, explore our Shopify SEO services or contact our team at Soda Web Media.